
No products
Product successfully added to your shopping cart
There are 0 items in your cart. There is 1 item in your cart.


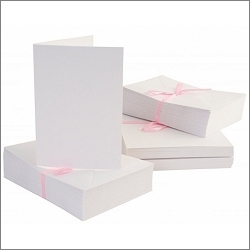


Dream Roses gift box, gift card and mini envelope.
The little gift card measures 7.3 x 5cm when folded, perfect to add to your wrapped present with tape or ribbon.
Simply print the sheet of gift cards onto quality white card, cut out with a craft knife and ruler and fold down the crease line.
The gift card fits in the envelope shown here which is the largest one on the mini envelopes sheet. There are three sizes on the sheet, the smallest two of which can be used as embellishments on a card.
This one is the right size for the gift tag or you can even add a little something to it and tuck it inside your card as an extra little gift - home-grown seeds would be lovely (probably best to put them into a tiny grip-seal bag before adding them to the envelope to prevent leakage).
To make up the envelope, cut it out with a sharp craft knife and ruler and fold on all the lines.
Add narrow double-sided tape to both the bottom and side flaps and seal. Seal the top flap with double-sided tape once the contents have been added.
Finally, the pretty gift box here is perfect for jewellery or even small sweets or a single homemade cookie! My box here even has a pretty rose-printed inside.
To make the box, print the box sheet onto quality white card, then turn the card over in the printer and print the rose background onto the other side of the card.
Cut out the box with a sharp craft knife and ruler, then lightly score all the lines with an embossing tool or empty ball-point pen.
Fold completely on all the crease lines and run your finger up the fold - this will ensure that your box doesn't ping undone once taped.
Add squares of double-sided tape to each corner flap and seal firmly.
Add your contents and tie with ribbon to finish.
Products used on the Dream Roses Gift Box, Gift card & Envelope
 £2.75
£2.75
