
No products
Product successfully added to your shopping cart
There are 0 items in your cart. There is 1 item in your cart.
-
-

We also have download sets featuring up to 40 A4 sheets, with most sets having projects using the sheets.Download Sets
-


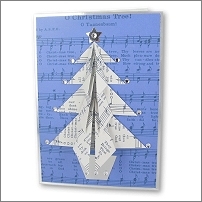

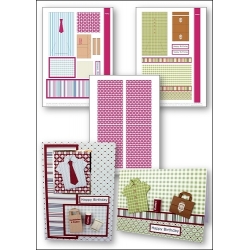
Fabulous modern origami shirt card with a couple of cute miniatures to match.
I've made the background on this card from the individual backing papers, and then devised the sheet that has all the pre-done components, so it's up to you as to whether you pick the easy way or the hard way....!
For this one print:-
The Shirt and Briefcase Card Kit Green onto quality white paper (easy way)
For the harder, more committed, card-maker way print:-
The Casual Shirts Green Squares sheet onto quality white paper
The Business Lunch sheet onto quality white paper
The Briefcases and notebooks sheet onto quality white paper
The green gingham background onto quality white paper
The green circles background onto quality white paper
The green stripes background onto quality white paper
The plain burgundy sheet (or use one of the coffee cup strips) onto quality white paper
The greetings sheet onto quality white card
What a lot to print, one sheet option probably best....... The only thing that goes a little wrong is that the greeting on this sheet will be printed on paper rather than card. Either mount the paper version onto plain or metallic card or print the greetings sheet separately onto card and use that instead.
Using the one-sheet method, cut out the background piece and stick it to an A6 white card blank with double-sided tape. Trim the card if necessary.
This piece has the border printed on it already, but for a little extra depth you can add the additional border piece if you want to (stick it to plain white card if you like).
To make the origami shirt:-
Start off with a piece of paper that is 13cm x 7.5cm or one of our ready-done origami shirt pieces which has pre-printed guide lines on it. If you're using the latter, the triangular guide line arrangement should be at the top of the piece (hard to see here).

Fold the paper in half, with the pattern still visible, and then unfold it. Our ready-done shirts have small guide lines at each end - use a ruler to emboss along this line first before folding for a really accurate fold.

Turn the paper over and fold the two long edges in towards the centre crease so that they meet neatly in the middle.

Turn up the two bottom middle corners so that they meet the outer edge of the paper. This will form two diagonal creases.

Turn up the bottom of the paper and fold it over where the flaps from the previous step end.

Stick your fingers inside the folded up area. Grab hold of the tip of the corner piece on one side. Pull it out and to the side. Now repeat this for the corner piece on the other side.

Now tuck each corner back inside itself to form the sleeves.

Turn the paper over and emboss the straight crease line with an embossing tool or cocktail stick, then fold (embossing it first makes for a neater fold).

Turn the paper over again and emboss the two angled crease lines before folding them in to form the collar. Make sure that the tips of the collar meet.

Finally fold the bottom of the paper up and under the tips of the collar. Shirt folding is complete!
When you have completed the shirt, use strips of double sided tape on each side to seal it shut.
To make the coffee cup, carefully cut out the long burgundy coffee strip and start to roll it using a cocktail stick. Once it's started, you can take out the cocktail stick and continue to roll to the end. Let it out a little until the roll is the size you want and stick the end with double-sided tape.
For the briefcase, cut out the briefcase piece and strap. Emboss all the crease lines with a cocktail stick - this makes it a doddle to fold neatly.
Fold in the side pieces, then fold the two end over the middle piece. Fold one of the strap pieces in half, then stick this piece down with double-sided tape.
For the strap, again use a cocktail stick to emboss the crease lines. Then fold in the lines, using a cocktail stick or pokey tool to help you as it's a bit fiddly. Add a little tacky glue with a cocktail stick to stick it together. Fold the two ends of the piece at right-angles to form the handle, then add it to the back of the briefcase with double-sided tape.
Arrange the shirt, coffee cup, briefcase and greeting on the card, and when you're happy with the arrangement, stick all the pieces except the coffee cup with double-sided tape. Add the coffee cup with a strong tacky glue such as Aleene's.
See all of our origami card projects on![]()
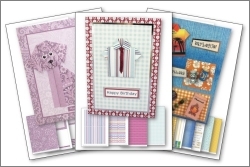
Products used on Origami Shirt & Briefcase Card
 £2.75
£2.75
